Monday, September 21, 2015

An Evening Rescue in Brummiegrad

This is an after-action report for a solo game I played over the weekend. The setting is the badly damaged city of Birmingham (Brummiegrad) during the Intifada. The Islamic State (IS) forces have three prisoners and are interrogating them (re: torture) at a ruined factory in the Ward End section of the city. A drone identified the location and a small mixed section of UK soldiers infiltrate the area to attempt a rescue.

The IS forces (the solo side) consisted of a Veteran, two Average fighters, and six novices. Their objective is to defend a position and prevent the UK soldiers from rescuing the prisoners.
  • Veteran - Muhammed w/ AK
  • Average + Sniper Training - Elam w/ AK
  • Average - Hussein w/ RPG-7
  • Novice - Saqqaff w/ AK
  • Novice - Saab w/ RPK
  • Novice - Albaf w/ AK
  • Novice - Alfarsi w/ AK
  • Novice - Abdulla w/ AK
  • Novice - Sultan w/ AK


The UK mixed section consists of three Royal Marines and two members of the West Midlands Police. The West Midlands Police have a deep knowledge of the area and are armed like soldiers, a role they’ve played ever since the beginning of the Intifada.
  • Elite - Sgt. Brady w/ SA80 + UGL
  • Veteran - Pvt. Entovich w/ SAW
  • Veteran - Pvt. Dooney w SLR
  • Average - Patrolman Karchee w/ SA80
  • Average - Patrolman Foster w/ SA80

The scenario takes place in the late autumn at dusk (–25 to Spot).

The UK soldiers approach from the south and initially attempt to get past a guard post by stealth.

Note on my action counting: The first number is the turn, the second number is the combat phase, and the third number is the rolled order of action. For example, 2.1.6 is turn two, combat phase one, and the character rolled a 6 on a d10 (house rule).

1.1   No Action
1.2    No Action
1.3    Sgt. Brady crawls across an open section to another position
1.4   Sultan fails to spot the crawling Brady (roll of 91)

1.4.5   Pvt. Dooney craws across the same open section and is spotted by Sultan. Sultan snap fires (04), hits Dooney for 7 damage, but Dooney’s armor absorbs the damage. Dooney swears prolifically but affirms that he’s all right.
1.5.5  Sgt. Brady aims and shoots Sultan, causing a Serious wound. Sultan is knocked unconscious.

1.6.1  Elam, in the ruined factory turns and runs 12m.
1.6.2  Patrolman Karchee runs 18m across the road to the car blocking the entrance to the alleyway.
1.6.4  Hussein, also in the factory, turns and runs toward the shooting.
1.6.6  Patrolman Foster runs 18m across the road toward the entrance of the ruined building.
1.6.8  Alfarsi emerges from the building adjacent to the factory and looks around, seeing nothing (failed spot).
1.6.9  Sultan begins to bleed out.
1.7.2  Brady runs 12m and stops at the car.

1.7.2  Muhammed orders Saqqaff to guard the prisoners and then runs outside to direct the fighting.
1.7.3  Pvt. Entovich grabs his SAW, lurches off the ground, and makes a run for the fighting.

1.7.4  Abdulla, full of piss and vinegar, runs outside and makes a beeline toward the sounds of fighting (18m)
1.7.5  Saab takes a position near the overturned truck and attempts to see what is going on and fails.
1.7.6  Albaf emerges from the building and takes up a position nearby.
1.7.10  Dooney passes his Morale test, curses in several languages, stands, and runs across the street toward his fellow soldiers.
1.8.1  Hussein picks up his RPG-7 and walks to a position he can peer down the alley but fails to see anything.
1.8.3  Patrolman Karchee takes a knee at the front of the car and tries to see what’s going on at the other end of the alley and fails.
1.8.6  Alfarsi continues to try and see what is going on and fails every time.
1.8.7  Foster reaches the building and takes a position flanking an opening in the building.
1.8.8  Sultan remains unconscious and continues to bleed out.
1.8.10  Elam edges between the overturned truck and the BMW and attempts to get a bead on the soldiers at the end of the alley and fails.
1.9.4  Muhammed takes a position right behind Elam and spots Sgt. Brady behind the car.

1.9.5  Entovich, always the last to the party, reaches the car and gets his SAW ready for action.
1.9.6  Brady spots Elam and gets off a quick shot. It hits but only grazes Elam, causing a Light wound.
1.9.8  Abdullah, races through the rubble, nearing a flanking position.
1.9.10  Dooney reaches the doorway of the building and looks into the ruined center, seeing nothing.
1.10.6  Karchee, unable to see anything at the end of the alley in the dim light, struggles to get a target.
1.10.7  Sultan remains unconscious and enters Critical stage from blood loss.
1.10.8  Hussein takes a knee near the edge of the overturned truck and sees the three soldiers behind the car at the end of the alley. He brings his RPG-7 to bear.
2.1.3  Saqqaff continues to guard the prisoners.
2.1.6  Saab runs and stops and successfully spots the UK soldiers.
2.2.1  Alfarsi runs to cover and stops.
2.2.2  Foster peers over the damaged wall, sees Abdulla running toward him and shoots him. Abdullah takes a Serious wound and skids to the ground.

2.2.10  Karchee finally gets a bead on Hussein and fires, but misses.
2.3.2  Albaf carefully walks forward and spots Foster.
2.3.4  Saqqaff continues to guard the prisoners.
2.3.5  Saab rips off a long burst with his RPK but the novice fails to hit a target (although all three soldiers have to make a Morale test)

2.3.6  Entovich passes his Morale and shoots at Saab, missing.
2.3.7  Dooney enters the building and fails to see the fighter on the other side of the wall.
2.3.8  Abdullah, his body stitched with bullets, remains unconscious and begins to bleed out.
2.3.9  Brady brings his underbarrel grenade launcher up and fires. The explosive lands within a few meters of Elam, Hussein, and Muhammed, who have no cover from that direction. All three are killed ugly (37, 30, and 18 damage).

2.4.1  Sultan remains unconscious as his lifeblood pools around him.
2.4.3  Foster sees Albaf and gets a quick shot off, but misses.
2.4.5  Karchee watches for Saab to step around the corner with the RPK and fires a burst into his chest, killing him.
2.4.6  Alfarsi makes his Morale check (Alluha Ackbar!) and takes an aimed shot at Foster but still misses.
2.5.3  Saqqaff, overcome with curiosity, looks outside and sees the gory remains of Elam, Hussain, and his leader Muhammed. The smell of ammonia follows him as he runs away.
2.5.4  Dooney realizes that there is a fighter on the other side of the wall, yells “Frag Out” and tosses a grenade. Unfortunately, it lands on the other side of the low wall. When it detonates, it shreds the unconscious Abdullah and does enough damage to kill Alfarsi. However, it also does 10 damage to Foster, although his armor absorbs most of it, leaving him with a light wound and burning desire to put his boot up Dooney’s arse.

2.5.9  Brady advances around the car and up the alleyway.
2.5.10  Entovich follows behind Brady.
2.6.3  Karchee stands from his position and runs to follow Brady and Entovich.
2.6.4  Albaff, having just seen his friends killed and hearing no returning fire from his side, fails his Morale check and runs like a demon between the buildings and down the road toward safety.

2.6.8  Foster passes his Morale.

At that point there were no remaining intifada forces on the table, with seven killed and two forced to retire. The combined patrol rescued the three prisoners and called for medical evac. The victors suffered only a light wound, ironically caused by Dooney’s poor application of a grenade. Later, Foster kindly suggests that the next time Donney gets the urge to “Frag Out”, Foster will place the aforementioned frag firmly in Dooney’s rectum.


Monday, August 31, 2015

Skirmish at Bordesly Green

The following is a brief AAR of a short solo game that I played over the weekend. The scenario was played in my European Intifada setting, in a Birmingham (UK) that has been badly damaged by fighting between UK soldiers and Islamic State forces and is nicknamed “Brummiegrad”.

Location: Intersection of Hob Moor Rd & Yardley Green Rd (Bordesly Green, Birmingham, UK)
Time: Dusk (–25 to Spotting)
Weather: Clear

Missions

  • UK Mission: One Section, Fireteam A, was to reconnoiter a 3-story building at the corner of Hob Moor Rd. and Yardley Green as an OP. Previous drone recon had shown the building to be empty.
  • IS Mission: Barrak’s Band (7 fighters) was to hold the recently occupied northern side of Yardley Green Rd on both sides of Hob Moor Rd.

Action

One Section, Fireteam A (L. Corp. Avery, Pvt. Broderick, Pvt. Chen, and Pvt. Denton), approached the target building by traversing through a bombed out section of the west side of Hob Moor Rd. until reaching Yardley Green Rd.


L. Corp. Avery went prone and surveyed the target building and nearby buildings but failed to see the hiding IS fighters in the target building and the building to the east, across Hob Moor Rd.

Pvt. Broderick made a dash across Yardley Green Rd. and came under snap fire from IS fighters with AKs and an RPK.


L. Corp. Avery (kneeling) and Pvt. Denton returned fire.

Additional IS fighters fired on Avery and Denton from the target building and the building to the east (a fighter with an RPG spotted Avery but could not fire due to potential backblast).

Broderick failed his morale check and was Retired, leaving the board and giving the IS a victory.

Avery was hit by fire incoming fire and received a Serious Wound.


Denton and Pvt. Chen evacuated Avery off the board, leaving the buildings in the hands of the IS.

Skirmish Outcome

  • UK: 1 Forcibly Retired and evacuation of 1 Serious Wound
  • IS (VICTOR): No casualties, in control of the target building


Wednesday, August 5, 2015

Flames of World War III: Battlefield Announced Team Yankee

As a child of the Cold War, a conflict between NATO and the Soviet Union in Europe seemed a near inevitability to me growing up. I consumed fiction from the era, including Clancy's Red Storm Rising, The Third World War by Sir John Hackett, and the novel that it inspired, Harold Coyle's Team Yankee. I distinctly recall watching the Berlin Wall falling on television and feeling elated for the East Germans but also thinking, "Damn, that's going to put in crimp in my Twilight 2000 campaign."

The greatest war that never was (THANK GOD) has continued to fascinate me and I continue to read what is now alternative history fiction as well as taking delight in the uncovering of both side's formerly secret plans. I've dabbled with a few wargames for the era, including Force on Force's Cold War Gone Hot (which is almost as good a historical read as a wargame resource) and playing a few Skirmish Sangin scenarios, but never really jumped feet first into anything.

That may be changing, as Battlefield has announced Team Yankee, a Cold War setting for Flames of War.


Of course, its based on the book by Coyle but I suspect there's going to be a pretty wide range of miniatures and other resources for it, including BAOR (British Army On the Rhine) and West German sourcebooks.

Now I'll just have to teach the youngsters that I play with that there was a time before the Internet and cell phones and Starbucks and...

Friday, July 31, 2015

Skirmish Sangin @ Gen Con, 2nd Game

I had a great first and second game of Skirmish Sang in at Gen Con. Due to the fact that the game was activated just last week (I submitted it back in March), I had only one player for each session. Still, it was a couple of fun teaching games using the Hearts and Minds free scenario. I had my ass handed to me in both but I'm going to chalk it up to a lack of sleep and focusing on teaching the game. That, and my piss-poor choices to attack in piecemeal and not making effective use of cover. Still, it was a lot of fun.

Tomorrow I'm going to be running Savage Worlds RPG with the new Lankhmar setting. Its a setting based on Fritz Lieber's Fahfered and the Grey Mouser stories, considered among the first and best Fantasy writing out there.

Fantasy is my weakest area, so I hope I do it justice.

Corvis Belli and Infinity

I just happen to run into Carlos from Corvis Belli here at Gen Con. Their Infinity miniatures game is a work of art and he is nothing but a class act. The gaming industry is blessed with some great people and he's one of the top. Do yourself a favor and check out their awesome game.

Halo Sneak Peek

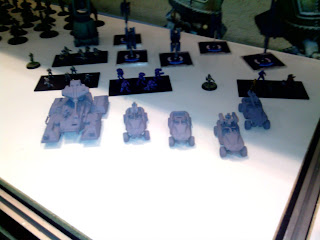
The 15mm version of Halo ground fighting vehicles. Designer and me.

Waiting for the Dealers Hall to Open

Waiting on Thursday for the hall to open. Pretty sure a lot of fire codes were broken.

Gen Con!

I'm at Gen Con! I met the fine folks at Skirmish Sangin booth and ran one game at 9 and waiting to start another at 1.

I'm doing the Hearts & Minds free scenario. Check out my table.

Monday, July 13, 2015

Tank Hunters


In keeping with my recent turn toward the real-world conflict in the Ukraine, I present the following scenario. While written for the Skirmish Sangin miniatures game, the scenario is adaptable to other games with some work.

The Russian Separatists have learned that a Ukrainian T-55 tank that had been damaged is now repaired and is returning to combat. Although old and outdated, the reintroduction of the T-55 threatens to swing local battles against the Russians. The route to the battle field is known to the Russians and a group has infiltrated the lines to ambush the tank.

The Ukrainians must get the T-55 to the battle lines as soon as possible and are overconfident that their rear areas are safe. They have assigned only a jeep armed with a machine gun to lead the tank and provide additional security.


This scenario is one that could be a total wipe-out for either side. As far as points, the Ukrainians far outweigh the Russians and the T-55 carries enough firepower to destroy the ambush team. However, the Russians have the element of surprise and the tank's range of motion is potentially restricted by walls and muddy terrain.

Scenario Rules

Turret Slew

At the start of the scenario the main gun and coaxial machine gun are facing forward. The turret of the T-55 must be slewed left or right to bring its weapons to bear on any target not in front of it. Doing so takes time, specifically one phase per 90 degree turn. The main gun and the coaxial MG cannot fire on the ambushers until after it has moved.

Cold War Throttle

The maximum speed of the T-55 is 10' (20 meters) while on the road and 7' (14 meters) while off road. Note that this does not apply to the Ukrainian jeep.

Scenario Setup


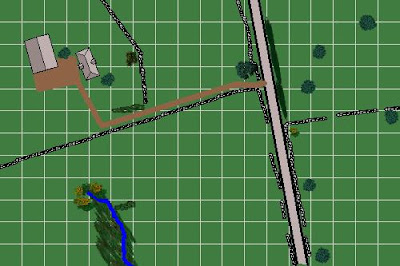
Each square is 10 meters. The walls shown on the map are low rock walls (1 meter tall) and provide medium cover. The hedges along the northeast portion of the road are 2 meters tall and provide Medium cover to spot but no cover to area-effect weapons. All fields are considered plowed/mud and -20% to driving

The field to the southwest contains a small wetlands area that is lower than the surrounding terrain. This provides the equivalent of Soft Cover. Travel through the area by a vehicle uses the Ford difficulty (-20%) in addition to the plowed/mud of the fields.

The Russians have chosen to attack near an abandoned farmhouse while the tank is potentially hemmed in by stone walls on either side of the road. The Russians must be located within 18' of the left side and begin the game Hidden. Reminder: The minimum distance for the RPG-7 is 5' (10 meters). 

The Ukrainians enter the board from the top (north) and must exit along the southern edge of the board (not necessarily on the road). The jeep must go first, followed by the tank.

Russian Brief


"We've learned that a T-55 that has been languishing in a Nationalist repair depot is ready to return to combat. Even though its older than my father, this beast will make our lives difficult unless we stop it. We know the route it will take and have hand picked a team of fighters armed with RPGs to intercept it. With luck, the tank will never reach the front lines."


Ukrainian Brief

"The mechanics have managed to resurrect one of our old T-55s. It smells like a refinery and looks like my mother-in-law, but it's firepower will terrify the insurrectionists. But first, a small group of soldiers in a jeep will guide our revived beauty to the front lines."


Victory Conditions


Russians


  • For each Ukrainian killed or wounded: 10 pts
  • Jeep destroyed: 25 pts
  • T-55 destroyed: 100 pts

Ukrainians


  • For each Russian killed or wounded: 10 pts
  • Jeep successfully exits board: 25 pts
  • T-55 successfully exits board: 100 pts

Monday, June 8, 2015

Pisky Firefight


I'm going to leave the European Intifada for a post or two and go to a more real-world conflict. The conflict in the Ukraine has been in the news for several years now. The nation went through a period of civil unrest followed by a secession movement in the east by ethnic Russian separatists. It's quite possibly the world's worst kept secret that many of the "separatists" are in fact Russian troops operating out of uniform and that Russia is actively supporting the insurgents with weapons, training, and heavy equipment.

The Ukrainian national forces have gone through an extended period of poor support by the government and is largely operating on Soviet era equipment. When the secession began and combat occurred, the Ukrainian army had to scrounge just to find batteries for the few vehicles they had maintained. Even now, the military is poorly equipped thanks to the heavy debts of the government.


This scenario focuses on the ongoing fighting in the village of Pisky, outside the secessionist-held city of Donetz. The village has been the scene of near constant fighting and its population has dwindled from approximately 3000 to about 50 people, mostly those who cannot leave.

Setup


An intersection has become valuable property in the fighting. It is dominated by a damaged but still intact house (labelled #47 on the map) that is currently occupied by a squad of Ukrainian troops. The separatists intend to seize the house and either kill or capture the Ukrainians. They have a larger, better equipped and trained force but unfortunately lack the armoured firepower to make the assault a sure thing. For their part, although under powered and largely Novices, the Ukrainians have placed several (3) booby traps around the area of the house. The house provides Hard Cover (50%).


Combat takes place at night (-50 to Spot). Remember the -30% to Spot penalty for being within 12" of a grenade.

Phase 1 of Round 1 begins with the Ukrainians located in or near the house labelled 47. The Russians enter the board from the east and southeast.

Ukrainian National Troops


"This road is where the Russian bastards want to bring in some of the BTRs that Uncle Putin is handing out. But they can't do that until this very house is theirs so that makes this wreck the most important real estate in the Ukraine. Fight to keep it like it was your mother's own heart. "


The Ukrainians have three booby traps (grenades) to be placed on copy of map before game.


Russian Separatists


"Gather round and listen up. Our fight here will be much easier if we can bring in armoured vehicles and more heavy weapons. But to do that, we need to take the house with the second floor. We can do it, but we must be brave and get in close and use our grenades to clear the place. This is a night for dirty fighting."


Victory Conditions


Ukrainians

  • For every Russian killed or Seriously Wounded: 10 pts
  • For every every Ukrainian in the house at the end of 4 rounds of combat: 25 pts

Russians

  • For every Ukrainian killed or Seriously Wounded: 10 pts
  • For every Russian in the house at the end of 4 rounds of combat: 25 pts


Sunday, May 3, 2015

New Skill Packages

In character creation in Skirmish Sangin there are skill packages that can be purchased to increase a particular figure's skills and Morale. Some, like Corporal or Officer, reflect specialized training so that the individual can fulfill a role in the unit. This is different from purchasing a higher level of character, which reflects a general improvement of skills across the board.

Although most modern militaries practice cross - training, some people are simply better at some things than others. Whether it's because of talent, training, or experience, not everyone is equal at some things.

So, I've created a pair of new skill packages for Skirmish Sangin. This will hopefully allow a little more diversity in characters and make games that much more fun.

Big Toys For Big Kids
+10% to Heavy Weapons
10 pt cost per character at character creation

Driver Course Star
+10% to Driving
10 pt cost per character at character creation

Sunday, April 19, 2015

Terrain Weekend

One thing I am a sucker for is a great looking gaming table. I love the tables made to demo Skirmish Sangin and I try to do just as good in 20mm scale. While doing a c9ouple of solo games (my daughter calls it "playing with myself"), I realized that I have several buildings and vehicles, but not much in the way of trees an hills to match the terrain of Afghanistan or Iraq. So, I spent an evening and then some manufacturing more vegetable matter to hide behind or among. 

While doing some research and watching helmet-cam videos taken in the area I was struck by how familiar it looked, despite the fact that I've never been there. Then it dawned on me that Afghanistan looks a great deal like where I grew up along the Utah Idaho border. Sure, there are differences in the towns and built up areas, but once you head into the Wasatch Mountains, I'd be hard pressed to tell you if I was closer to Sangin or Salt Lake City. 

Anyway, here are some sample pics:

This small broad hill is only a little taller than 1" but can be pivotal for a battle space. Above the hill is a row of low bushes like one might find along a creek or ditch.

A few trees on a base of two CDs glued together. I don't think anyone would use this as cover but it may provide some concealment or a rally point.

A small orchard. I honestly don't know what they grow in Afghanistan besides rocks and mujahadin but these could be any kind of bushes or low trees. . 

Another set of sparse trees. Again, this isn't the dense forests of Europe but the rocky terrain of a generally inhospitable land.

Friday, March 27, 2015

Where The Hell Are We Fighting?: Street and Shop Signs

I’m a recent wargaming convert but in my wild and wooly youth I enjoyed building highly detailed models and dioramas. Nowadays, when I lay out an Afghan or Iraqi village for a game, the modeler part of me screams that it’s not done yet: There should be details that add authenticity and clues to location, such as shop signs, street trash, farm animals, and the ever-present spiderweb of overhead wiring that seems to grow of its own accord in the Middle East.


Most of these details won’t make a difference in a game. Some minutiae, such as wiring between buildings, will get in the way of moving figures and should be minimized or even avoided.

However, that doesn’t mean that a wargame board and terrain should be a bland, anonymous setting that could be anywhere from Basra to Birmingham. Some details are easy to add, such as street signs, flags, and logos.

I strongly recommend you check out 5682 Miniatures, a producer of excellent and easy-to-use decals and print-ready files that will add a range of color, depth, realism, and authenticity to your wargame scenery. 


These are inexpensive, come in 15mm, 20mm, and 28mm sizes, and add so much to a scene. 

In addition, I’ve found a number of images for shop and restaurant signs from the Middle East. Some are for chain stores and others are creations from people off the intertubes. I claim no copyright images for them but you should feel free to save and print them for your own use.