Wednesday, March 30, 2016

Firefight at Kilvasten Farm

The Midlands of England and the border country with Wales suffered at the hands of scores of small bands of Islamic State fighters that acted as scouts, scavengers, and death squads. These isolated cells operated independently under a charismatic leader and averaged a dozen individuals. They dressed in civilian clothing, traveled in stolen civilian vehicles, and rarely possessed heavy weapons (with exception of the ubiquitous rocket-propelled grenade launcher).

Most of these groups attacked isolated farms, small villages, and refugee camps. They committed robbery, arson, rape, and murder in their campaign to terrorize the population and pressure the already fragile local and national governments.

In response, the Home Guard tasked the surviving elements of the 4th Mercian Regiment  with protecting the area. In addition to reservists and police volunteers, the 4th Mercian received a small number of advisors from the Special Air Service. Because armoured vehicles were in short supply, they were initially outfitted with civilian SUVs of various types. Some older armoured vehicles were reactivated for their use, including several venerable (and widely disliked) Saxon APCs.

Because of the large area they were assigned and the limited number of soldiers available, units of the 4th Mercian became adept at operating in small groups with considerable autonomy. Platoons split into sections and fireteams to patrol the country lanes and village roads, trusting to sometimes spotty radio communication for backup.


A History of the European Intifada by Manheim Frye


Scenario


A fireteam of the 4th Mercian Regiment believes that a group of Islamic State fighters are currently bedded down in the remains of Kilvasten Farm, a small farm that was an early casualty in the fighting. Because the IS group is highly mobile and likely to leave before assistance arrives, the fireteam elects to assault the fighters at dawn.


Board


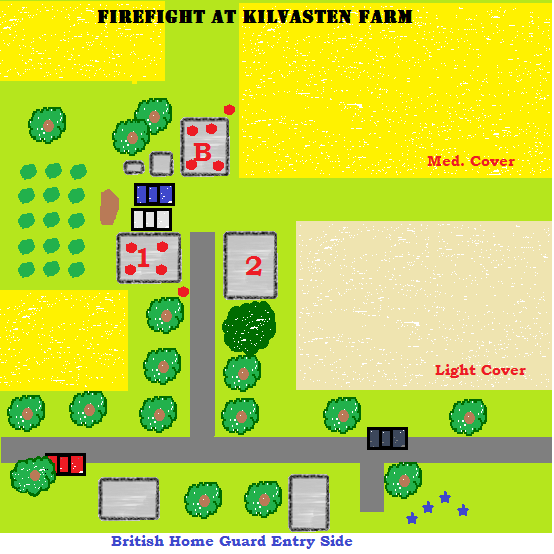
The fighting takes place in and around an abandoned farm in the Midlands of the UK. The ground is flat with many trees and bushes.

The structures marked House 1 and House 2 are abandoned and burned out with no roofs. The barn (marked B) is intact, as are the shed and chicken coop to the left. There are two vehicles, a pickup truck and an SUV hidden behind House 1.


Kinvastin Farm Map Marked.png


Scenario Rules


  • Field of Dreams: The fields in the right of House 2 provide Soft Cover while the rest of the fields provide Medium Cover.
  • Renovations in Progress: Houses 1 and 2 have many holes blasted through the walls and figures can enter them through any wall.
  • Waking Up: IS fighters within House 1 and the Barn cannot take an action until either the guards successfully Spot the enemy and calls out to his comrades.
  • Is Hard to Do: Those IS fighters in House 1 and the Barn require 1 action phase to exit the structure. Figures are placed within 1” of the structure at the completion of their actions.

Victory Points


IS Victory Points

For every British soldier killed or wounded, 25 points


4th Mercian Victory Points

For every IS insurgent killed or wounded, 10 points


Setup


The British Home Guard forces start within 6” of the bottom of the board. The IS insurgents have two fighters on guard, with one above the barn and another below House 1. Both start as Hidden. The rest of the IS fighters are split between House 1 and the Barn.


Briefing


IS Briefing
“Awaken my brothers and gather your wits. It’s time to say our prayers, eat our breakfast, drink our tea, and prepare for another day of service to the Caliph. There are more kafir we must fight before we can rest again.”


UK Briefing
“There’s a good chance that the terrorists responsible for a lot of the murders around here are somewhere over there in those buildings. The problem is that the rest of the platoon won’t get here for another 20 minutes and the bastards can bugger off at any moment. I say that we don’t give them the chance.”


Variations

This scenario was written and played assuming good weather. However, it could play out differently if the weather were to turn foul and heavy wind and rain (does it rain in England?) were to restrict Spotting to 12".

Monday, September 21, 2015

An Evening Rescue in Brummiegrad

This is an after-action report for a solo game I played over the weekend. The setting is the badly damaged city of Birmingham (Brummiegrad) during the Intifada. The Islamic State (IS) forces have three prisoners and are interrogating them (re: torture) at a ruined factory in the Ward End section of the city. A drone identified the location and a small mixed section of UK soldiers infiltrate the area to attempt a rescue.

The IS forces (the solo side) consisted of a Veteran, two Average fighters, and six novices. Their objective is to defend a position and prevent the UK soldiers from rescuing the prisoners.
  • Veteran - Muhammed w/ AK
  • Average + Sniper Training - Elam w/ AK
  • Average - Hussein w/ RPG-7
  • Novice - Saqqaff w/ AK
  • Novice - Saab w/ RPK
  • Novice - Albaf w/ AK
  • Novice - Alfarsi w/ AK
  • Novice - Abdulla w/ AK
  • Novice - Sultan w/ AK


The UK mixed section consists of three Royal Marines and two members of the West Midlands Police. The West Midlands Police have a deep knowledge of the area and are armed like soldiers, a role they’ve played ever since the beginning of the Intifada.
  • Elite - Sgt. Brady w/ SA80 + UGL
  • Veteran - Pvt. Entovich w/ SAW
  • Veteran - Pvt. Dooney w SLR
  • Average - Patrolman Karchee w/ SA80
  • Average - Patrolman Foster w/ SA80

The scenario takes place in the late autumn at dusk (–25 to Spot).

The UK soldiers approach from the south and initially attempt to get past a guard post by stealth.

Note on my action counting: The first number is the turn, the second number is the combat phase, and the third number is the rolled order of action. For example, 2.1.6 is turn two, combat phase one, and the character rolled a 6 on a d10 (house rule).

1.1   No Action
1.2    No Action
1.3    Sgt. Brady crawls across an open section to another position
1.4   Sultan fails to spot the crawling Brady (roll of 91)

1.4.5   Pvt. Dooney craws across the same open section and is spotted by Sultan. Sultan snap fires (04), hits Dooney for 7 damage, but Dooney’s armor absorbs the damage. Dooney swears prolifically but affirms that he’s all right.
1.5.5  Sgt. Brady aims and shoots Sultan, causing a Serious wound. Sultan is knocked unconscious.

1.6.1  Elam, in the ruined factory turns and runs 12m.
1.6.2  Patrolman Karchee runs 18m across the road to the car blocking the entrance to the alleyway.
1.6.4  Hussein, also in the factory, turns and runs toward the shooting.
1.6.6  Patrolman Foster runs 18m across the road toward the entrance of the ruined building.
1.6.8  Alfarsi emerges from the building adjacent to the factory and looks around, seeing nothing (failed spot).
1.6.9  Sultan begins to bleed out.
1.7.2  Brady runs 12m and stops at the car.

1.7.2  Muhammed orders Saqqaff to guard the prisoners and then runs outside to direct the fighting.
1.7.3  Pvt. Entovich grabs his SAW, lurches off the ground, and makes a run for the fighting.

1.7.4  Abdulla, full of piss and vinegar, runs outside and makes a beeline toward the sounds of fighting (18m)
1.7.5  Saab takes a position near the overturned truck and attempts to see what is going on and fails.
1.7.6  Albaf emerges from the building and takes up a position nearby.
1.7.10  Dooney passes his Morale test, curses in several languages, stands, and runs across the street toward his fellow soldiers.
1.8.1  Hussein picks up his RPG-7 and walks to a position he can peer down the alley but fails to see anything.
1.8.3  Patrolman Karchee takes a knee at the front of the car and tries to see what’s going on at the other end of the alley and fails.
1.8.6  Alfarsi continues to try and see what is going on and fails every time.
1.8.7  Foster reaches the building and takes a position flanking an opening in the building.
1.8.8  Sultan remains unconscious and continues to bleed out.
1.8.10  Elam edges between the overturned truck and the BMW and attempts to get a bead on the soldiers at the end of the alley and fails.
1.9.4  Muhammed takes a position right behind Elam and spots Sgt. Brady behind the car.

1.9.5  Entovich, always the last to the party, reaches the car and gets his SAW ready for action.
1.9.6  Brady spots Elam and gets off a quick shot. It hits but only grazes Elam, causing a Light wound.
1.9.8  Abdullah, races through the rubble, nearing a flanking position.
1.9.10  Dooney reaches the doorway of the building and looks into the ruined center, seeing nothing.
1.10.6  Karchee, unable to see anything at the end of the alley in the dim light, struggles to get a target.
1.10.7  Sultan remains unconscious and enters Critical stage from blood loss.
1.10.8  Hussein takes a knee near the edge of the overturned truck and sees the three soldiers behind the car at the end of the alley. He brings his RPG-7 to bear.
2.1.3  Saqqaff continues to guard the prisoners.
2.1.6  Saab runs and stops and successfully spots the UK soldiers.
2.2.1  Alfarsi runs to cover and stops.
2.2.2  Foster peers over the damaged wall, sees Abdulla running toward him and shoots him. Abdullah takes a Serious wound and skids to the ground.

2.2.10  Karchee finally gets a bead on Hussein and fires, but misses.
2.3.2  Albaf carefully walks forward and spots Foster.
2.3.4  Saqqaff continues to guard the prisoners.
2.3.5  Saab rips off a long burst with his RPK but the novice fails to hit a target (although all three soldiers have to make a Morale test)

2.3.6  Entovich passes his Morale and shoots at Saab, missing.
2.3.7  Dooney enters the building and fails to see the fighter on the other side of the wall.
2.3.8  Abdullah, his body stitched with bullets, remains unconscious and begins to bleed out.
2.3.9  Brady brings his underbarrel grenade launcher up and fires. The explosive lands within a few meters of Elam, Hussein, and Muhammed, who have no cover from that direction. All three are killed ugly (37, 30, and 18 damage).

2.4.1  Sultan remains unconscious as his lifeblood pools around him.
2.4.3  Foster sees Albaf and gets a quick shot off, but misses.
2.4.5  Karchee watches for Saab to step around the corner with the RPK and fires a burst into his chest, killing him.
2.4.6  Alfarsi makes his Morale check (Alluha Ackbar!) and takes an aimed shot at Foster but still misses.
2.5.3  Saqqaff, overcome with curiosity, looks outside and sees the gory remains of Elam, Hussain, and his leader Muhammed. The smell of ammonia follows him as he runs away.
2.5.4  Dooney realizes that there is a fighter on the other side of the wall, yells “Frag Out” and tosses a grenade. Unfortunately, it lands on the other side of the low wall. When it detonates, it shreds the unconscious Abdullah and does enough damage to kill Alfarsi. However, it also does 10 damage to Foster, although his armor absorbs most of it, leaving him with a light wound and burning desire to put his boot up Dooney’s arse.

2.5.9  Brady advances around the car and up the alleyway.
2.5.10  Entovich follows behind Brady.
2.6.3  Karchee stands from his position and runs to follow Brady and Entovich.
2.6.4  Albaff, having just seen his friends killed and hearing no returning fire from his side, fails his Morale check and runs like a demon between the buildings and down the road toward safety.

2.6.8  Foster passes his Morale.

At that point there were no remaining intifada forces on the table, with seven killed and two forced to retire. The combined patrol rescued the three prisoners and called for medical evac. The victors suffered only a light wound, ironically caused by Dooney’s poor application of a grenade. Later, Foster kindly suggests that the next time Donney gets the urge to “Frag Out”, Foster will place the aforementioned frag firmly in Dooney’s rectum.


Monday, August 31, 2015

Skirmish at Bordesly Green

The following is a brief AAR of a short solo game that I played over the weekend. The scenario was played in my European Intifada setting, in a Birmingham (UK) that has been badly damaged by fighting between UK soldiers and Islamic State forces and is nicknamed “Brummiegrad”.

Location: Intersection of Hob Moor Rd & Yardley Green Rd (Bordesly Green, Birmingham, UK)
Time: Dusk (–25 to Spotting)
Weather: Clear

Missions

  • UK Mission: One Section, Fireteam A, was to reconnoiter a 3-story building at the corner of Hob Moor Rd. and Yardley Green as an OP. Previous drone recon had shown the building to be empty.
  • IS Mission: Barrak’s Band (7 fighters) was to hold the recently occupied northern side of Yardley Green Rd on both sides of Hob Moor Rd.

Action

One Section, Fireteam A (L. Corp. Avery, Pvt. Broderick, Pvt. Chen, and Pvt. Denton), approached the target building by traversing through a bombed out section of the west side of Hob Moor Rd. until reaching Yardley Green Rd.


L. Corp. Avery went prone and surveyed the target building and nearby buildings but failed to see the hiding IS fighters in the target building and the building to the east, across Hob Moor Rd.

Pvt. Broderick made a dash across Yardley Green Rd. and came under snap fire from IS fighters with AKs and an RPK.


L. Corp. Avery (kneeling) and Pvt. Denton returned fire.

Additional IS fighters fired on Avery and Denton from the target building and the building to the east (a fighter with an RPG spotted Avery but could not fire due to potential backblast).

Broderick failed his morale check and was Retired, leaving the board and giving the IS a victory.

Avery was hit by fire incoming fire and received a Serious Wound.


Denton and Pvt. Chen evacuated Avery off the board, leaving the buildings in the hands of the IS.

Skirmish Outcome

  • UK: 1 Forcibly Retired and evacuation of 1 Serious Wound
  • IS (VICTOR): No casualties, in control of the target building


Wednesday, August 5, 2015

Flames of World War III: Battlefield Announced Team Yankee

As a child of the Cold War, a conflict between NATO and the Soviet Union in Europe seemed a near inevitability to me growing up. I consumed fiction from the era, including Clancy's Red Storm Rising, The Third World War by Sir John Hackett, and the novel that it inspired, Harold Coyle's Team Yankee. I distinctly recall watching the Berlin Wall falling on television and feeling elated for the East Germans but also thinking, "Damn, that's going to put in crimp in my Twilight 2000 campaign."

The greatest war that never was (THANK GOD) has continued to fascinate me and I continue to read what is now alternative history fiction as well as taking delight in the uncovering of both side's formerly secret plans. I've dabbled with a few wargames for the era, including Force on Force's Cold War Gone Hot (which is almost as good a historical read as a wargame resource) and playing a few Skirmish Sangin scenarios, but never really jumped feet first into anything.

That may be changing, as Battlefield has announced Team Yankee, a Cold War setting for Flames of War.


Of course, its based on the book by Coyle but I suspect there's going to be a pretty wide range of miniatures and other resources for it, including BAOR (British Army On the Rhine) and West German sourcebooks.

Now I'll just have to teach the youngsters that I play with that there was a time before the Internet and cell phones and Starbucks and...

Friday, July 31, 2015

Skirmish Sangin @ Gen Con, 2nd Game

I had a great first and second game of Skirmish Sang in at Gen Con. Due to the fact that the game was activated just last week (I submitted it back in March), I had only one player for each session. Still, it was a couple of fun teaching games using the Hearts and Minds free scenario. I had my ass handed to me in both but I'm going to chalk it up to a lack of sleep and focusing on teaching the game. That, and my piss-poor choices to attack in piecemeal and not making effective use of cover. Still, it was a lot of fun.

Tomorrow I'm going to be running Savage Worlds RPG with the new Lankhmar setting. Its a setting based on Fritz Lieber's Fahfered and the Grey Mouser stories, considered among the first and best Fantasy writing out there.

Fantasy is my weakest area, so I hope I do it justice.

Corvis Belli and Infinity

I just happen to run into Carlos from Corvis Belli here at Gen Con. Their Infinity miniatures game is a work of art and he is nothing but a class act. The gaming industry is blessed with some great people and he's one of the top. Do yourself a favor and check out their awesome game.

Halo Sneak Peek

The 15mm version of Halo ground fighting vehicles. Designer and me.